Tuesday, October 14, 2008

Deep Fried Turkey Instructions and Tips

Do you want to learn how to deep fry a turkey that will amaze your family and friends? I've been making our Thanksgiving bird like this for years and I promise you've never tasted anything like a whole turkey deep fried to perfection. If you've never tried to deep fry turkey there are some important things to keep in mind. That's why I wrote this helpful article containing deep fry turkey instructions and tips to help your frying go smoothly.
First of all you need to pick up a Turkey Frying Set. You could just use a big pot and rig something up yourself but it will be a lot easier and safer to use a set specifically designed for deep frying turkey. They run around $39 to $79 and they're worth every penny. They come with a large pot, a sturdy metal stand, a thermometer, a burner you hook up to your propane tank, and a hook you'll use when moving the bird in and out of the oil. You should also pick up a pair of rubber gloves to protect you from splattering oil.


You'll also need several gallons of cooking oil. Peanut oil works best but its a little expensive. If you can't afford to splurge canola oil will work just as well.
To prepare your bird you need to wash him thoroughly inside and out. Make sure there are no pop up devices or anything else inside.
Next you need to measure how much oil you'll need for frying. Place your turkey in the pot and add water until the bird is completely covered. Remove the bird and then measure the amount of water left in the pot. Now you know exactly how much oil you'll need!
Use paper towels to dry your turkey both inside and out, then season it using whatever dry rub recipe you like. I don't recommend using marinade for deep frying turkeys because you want the bird to be dry when you lower it into the oil.
Make sure the inside of the pot is completely dry too and then add the oil. Heat it up to a temperature of at least 350 degrees. For safety purposes you should have everything set up outside. Never deep fry inside your house or garage. It's extremely dangerous.
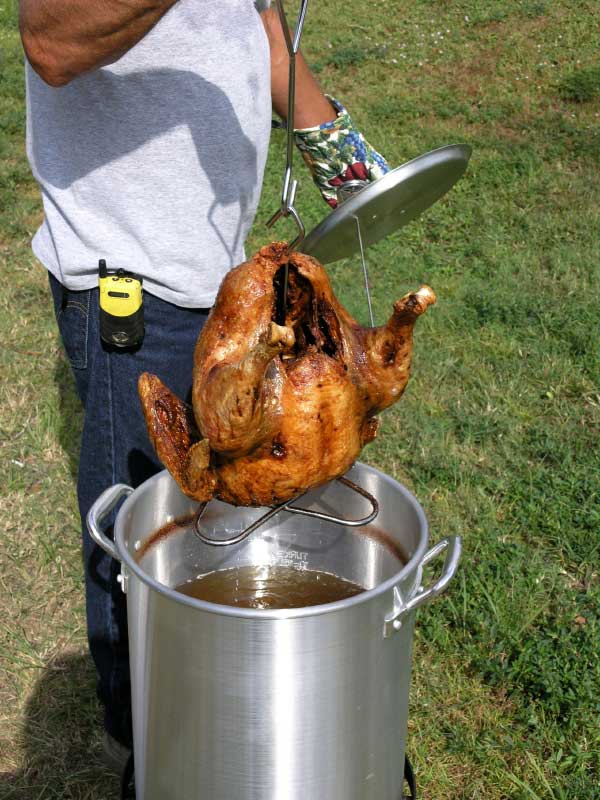
Once your oil is hot enough its time to carefully lower the bird in. Use extra caution and go slowly so you don't splatter oil or tip over the pot. You may want to have a friend standing by nearby just in case you need help.


Now one of the most common questions people ask is "How long to deep fry a turkey?" I never get tired of seeing the looks on their faces when I tell them just 3 1/2 minutes per pound. Isn't it amazing that the same turkey that takes hours to cook in the oven will be ready to eat in just 35-45 minutes when fried?
When the time is up turn off the burner and carefully remove the bird from the oil. Let it drain out and rest for about ten minutes and it will be ready for carving. Despite what you may think, it won't be all greasy and oily. If you followed my deep fry turkey instructions your bird will be juicy and delicious. You may never cook a turkey in the oven again!

Grilling Prime Rib

What's better for a big holiday dinner bash, a special celebration, or big birthday dinner? Prime rib is always a favorite, and grilling prime rib is one way to make sure your roast is succulent, juicy, full of flavor and mouthwatering. It also opens up your kitchen oven for all the side dishes that are so traditional with a big holiday meal!
Getting the Prime Rib Ready for Grilling
Defrost the prime rib, if necessary. You can have your butcher cut off the bones and then retie them onto the roast for cooking, if you'd like. The roast is easier to slice this way after it's grilled. However, don't get rid of the bones! Tying them to the roast will spread the richness and flavor from the bones throughout the roast, and they can help protect it from overcooking, too. Without the bones, your roast can dry out, and no one likes a dry prime rib!


Next prepare your favorite rub or spice seasoning. Rub the seasonings on every side of the roast, (including the bones), wrap in plastic wrap, and place the roast in the refrigerator overnight. This will help the spices to flavor the roast.
Grilling the Prime Rib
Low and slow is the way to make sure your prime rib is done to perfection and is still juicy, tender, and oh so mouthwatering. That means to allow at least 20 minutes per pound for your roast on the grill, and more if you like it medium to well-done. Each grill is different, and each grill heats differently, so you need to experiment with your particular grill to find out where it's the hottest and coolest, and how high the heat actually gets.
Don't rely on the built-in thermometer in your grill's lid, they are notoriously wrong. Invest in a good meat thermometer, and know the internal temperature of your roast when it should be done (more on that later).
To get great results, first, take your roast out of the refrigerator to warm up at least an hour before you plan to start cooking. Never put meat directly from the refrigerator onto the grill! The cold will seize up the meat, make it tougher and less juicy, and will rapidly bring down the temperature of your grill, too.
Next, heat up your grill on high for at least 15 minutes, or until it's as hot as you can get it. Turn down the heat to about 200 to 225 degrees, and put the roast on the grill. Close the lid, and don't open it except to check the temperature of the roast periodically.
Grill the roast until it reaches the desired temperature (see below). Remove the roast from the grill and allow to rest at least 10 minutes before carving and serving.
Roast Temperatures
For rare prime rib heat until the internal temperature is about 130 to 135 degrees. For medium prime rib heat until the internal temperature is about 145 degrees. For medium-well heat until the internal temperature is about 150 degrees. Even at medium-well, the end cuts should be well done, so you'll have well and medium well for those who want it.
Gas or Charcoal Grill
When grilling prime rib, you need a steady temperature. If you can keep your charcoal temperature steady, by adding more charcoal throughout the hours of cooking, then use a charcoal grill. However, gas grills maintain a more constant temperature throughout cooking, so if you're worried about losing your temp, and ruining your prime rib, try grilling prime rib on a gas grill for the best results.

Saturday, October 11, 2008

Roasted Chicken Recipes

These roasted chicken recipes are easy, quick and delicious. Just check these out and I'm sure you'll be amazingly surprised.
So put your hat on and get ready for some quick easy roasted chicken recipes:
>> Roasted Pecan Chicken
3/4 c Pecans, chopped 2 oz Creamy Goat Cheese 1 sm Clove Garlic, chopped 2 tb Olive Oil 1 1/2 ts Lemon Juice Pepper 3 1/2 lb Whole Broiler/Fryer Chicken 1 md Onion, sliced 1 Lemon, sliced 2/3 c Dry White Wine 2/3 c Chicken Broth 2/3 c Chicken Broth 1 tb Cornstarch 1 tb Cold Water
Cheese Spread: In a food processor combine pecans, goat cheese, garlic, olive oil, lemon juice and pepper to taste. Process until mixture forms a paste.


Roast Chicken: Preheat oven to 400F.Carefully loosen skin on chicken breast by gently working fingers under the skin starting from both the neck and body cavity ends. Be careful not to pierce or tear the skin. Spread cheese mixture in an even layer in chicken breast underneath the skin. Pull skin back oven cheese layer and secure with wooden picks. Tie chicken legs together.
Arrange chicken in a 13x9x2 baking pan on a bed of onion and lemon slices. Add wine and 2/3 cup broth. Roast, uncovered, at 400F for 1 1/4 to 1 1/2 hours until thermometer inserted between leg and thigh registers 180øF. Baste occasionally with pan juices during baking. If necessary, tent with foil toward end of cooking to prevent over browning. Remove chicken from pan and keep warm. Strain pan juices, discarding lemon and onion slices. Skim fat from pan juices.
>> Chicken and Roasted Pepper Soup
Ingredients: 2 boneless skinless chicken breast halves (1/2 pound) 1 jar roasted red bell peppers -- drained (7-1/4 oz.) 1 medium onion -- chopped (1/2 cup) 2 cups chicken broth 2 tablespoons lime juice 1 tablespoon cilantro -- fresh chopped 1/2 teaspoon salt - optional 1/4 teaspoon pepper 2 cloves garlic -- finely chopped 1 cup jacamar -- peeled, cubed
Directions:
Set oven control to broil. Trim fat from chicken. Place chicken on Rack in broiler pan. Broil with tops 4-6 inches from heat 15-20 minutes, turning once, until juice is no longer pink when centers of thickest pieces are cut. Cut into 1/4 inch strips; set aside. Place peppers and onion in blender or food processor. Cover and blend On medium speed until smooth.
Heat pepper mixture, broth, lime juice, cilantro, salt, pepper, and Garlic to boiling in 2 quart saucepan; reduce heat. Simmer uncovered 15 minutes. Stir in chicken and jacamar; heat until hot.

Chicken Parmesan Recipes - Easy & Quick To Prepare!

These chicken parmesan recipes are easy, quick and delicious. Just check these out and I'm sure you'll be amazingly surprised.
So put your hat on and get ready for some quick easy chicken parmesan recipes:
>> Chicken Breasts Parmesan
4 Boneless Skinless Chicken Breast Halves 1/4 Cup Flour 1 Egg 3/4 Cup Bread Crumbs 1 Teaspoon Salt 1/2 Teaspoon Onion Powder 1/4 Teaspoon Garlic Powder 1/4 Teaspoon Paprika 1/2 Cup Chopped Onions 2 Cloves Garlic Minced 16 Ounces Tomato Sauce -- (canned ok) 1/2 Teaspoon Oregano 1/2 Teaspoon Basil 1/4 Cup Olive Oil 1/2 Cup Parmesan Cheese 4 Ounces Mozzarella Cheese -- shredded


Flatten each breast into an oval shape. Get out three bowls. Put flour in the first. Lightly beat the eggs in the second. In the third, combine the bread crumbs with the salt, onion powder, garlic powder and paprika. Dip each breast into the flour, then the eggs, and finally into the bread crumb mixture. Place on a cookie sheet and refrigerate to set coating--at least 30 minutes. Make the sauce by lightly sautéing the chopped onion and garlic and then adding the tomato sauce, oregano, and basil. Simmer 20 minutes. Heat the olive oil in a skillet and sauté the breasts until golden brown. Arrange them in a shallow baking dish. Pour the sauce over the breasts, top with parmesan cheese and bake at 350 for 30 minutes. Remove pan from oven and sprinkle mozzarella on breasts. Return to the oven for another 10 minutes.
>> Chicken Parmesan Version 2
1/2 c seasoned dry bread crumbs 1 tb parsley -- chopped 1 sm garlic clove -- minced olive or salad oil coarsely ground black pepper 2 tb dijon style mustard 2 lg chicken breast halves -- w/skin and bones, about 1 1/2 pounds 3 md plum tomatoes -- about 3/4 lb 2 tb parmesan cheese -- grated 1 t dried oregano leaves crushed 1/2 ts salt 1 bn watercress bottled olive oil and vinegar salad dressing
About 50 minutes before serving:
Preheat the oven to 400 Degrees F. In a small bowl, mix the bread crumbs, chopped parsley, minced garlic, 2 ts of the olive or salad oil, and 1/4 ts of the pepper, blending well.
Brush the Dijon style mustard onto the skin side of the chicken-breast halves, then coat with the bread crumb mixture, firmly pressing the coating mixture into the chicken. Spray an 11 X 7-inch glass or ceramic baking dish with non stick cooking spray.
Place the chicken, skin side up, in the baking dish. Bake the chicken, without turning, for 20 minutes. Meanwhile, cut each tomato, lengthwise, in half. On waxed paper, mix the Parmesan cheese, oregano, salt and 1/4 ts of black pepper, stirring to mix well. Sprinkle the cheese mixture over the tomato halves.
Add the tomatoes to the chicken in the baking dish and bake for an additional 15 to 20 minutes or until the coating on the chicken is crispy and browned and the juices run clear when the chicken is pierced with the tip of a knife.
To Serve:
Toss the watercress with the salad dressing. Arrange the tomatoes, chicken and the salad on 2 plates and sit down to eat.

Chicken Casserole Recipes

These chicken casserole recipes are delicious. Just check these out and I’m sure you’ll be amazingly surprised.
So here we go for some chicken casserole recipes:


>>Chicken Mac Casserole
~3 boned and skinned chicken breast halves cooked & cubed
~8 ozs elbow macaroni -- cooked and drained
~20 ozs frozen chopped broccoli -- cooked and drained
~8 ozs fat-free Sour Cream
~1 can reduced fat cream of chicken soup
~1 can cream of broccoli soup, condensed salt and pepper -- to taste
~2 c shredded low fat Cheddar Cheese
Cook chicken in boiling water. Remove chicken and cook macaroni in the Chicken cooking water; drain. Cook broccoli.
Mix sour cream and soups and then add chicken, macaroni, and broccoli. Pour all in a greased 9x13 pan. Top with cheeses. Bake at 350 for 45 minutes or until bubbly and heated through.
>>Chicken Enchilada Casserole
~3 tb Butter or margarine, melted
~1/2 c Chopped green bell pepper
~1 1/2 c Cubed cooked chicken beans
~2 c 15 oz ranch style
~1 c 4 oz green chilies, chopped
~12 ea 6 inch corn tortillas
~1 c Chopped onion
~1 ea Clove garlic, minced
~2 ts Flour
~1 1/2 c Chicken broth
~1 c Shredded Monterey jack
Sautee onion, pepper and garlic in 1 tablespoon butter. Combine onion mixture with chicken, beans, and chilies; set aside. Over low heat, combine flour and remaining butter; stir in chicken broth and 1/2 cup cheese. Stirring constantly, continue cooking until sauce begins to thicken and boil. Remove from heat.
Dip each tortilla into hot sauce to soften; fill each with 2 heaping tablespoons chicken mixture. Roll up. Arrange rolls in 9-by-13-by-2-inch baking dish. Combine remaining sauce with leftover filling; pour over rolls. Sprinkle with remaining cheese. Bake in 350-degree oven for 30 minutes or until heated through

Thursday, October 09, 2008

Broiled Garlic Ginger Pork Tenderloin with Broiled Vegetables

This easy dinner recipe is also an easy clean up. You need only a broiling pan and a cutting board to make the complete meal. The menu features broiled pork tenderloin and broiled vegetables. Add a nice slice of bread to round out the meal. The vegetables are broiled right alongside the meat for a quick, easy dinner recipe that is sure to please.


Garlic Ginger Pork Tenderloin Dinner
3/4 pound pork tenderloin1 Tablespoon garlic, minced1 Tablespoon fresh ginger root, mincedseasoned salt1 large onion, sliced thin2 small yellow squash or zucchini squash2 medium size tomatoes1-2 Tablespoons olive oilFew drops balsamic vinegar (optional)kosher salt
Preheat the broiler
Combine the ginger and garlic. Pierce the tenderloin all over the surface forming little pockets. Rub the ginger and garlic mixture into these pockets. Season the outside well with seasoning salt.
Place onto a broiler pan. Slice the onions, squash and tomatoes for broiling. Slice the squash in half lengthwise and the tomatoes crosswise. Slice the onion into slices and place on the broiler pan, cut side up, around the pork tenderloin.
Brush the onions, squash and tomatoes with oil, then sprinkle with kosher salt. Optional: sprinkle the tomatoes with a little balsamic vinegar.
Broil 4 - 6 inches from the heat for 8 minutes.
Turn the pork tenderloin over. Broil for another 6 minutes.
When the pork is done, transfer to a cutting board and let rest for 5 minutes.
Cut the pork into thin slices and arrange on dinner plates with the onion, squash and tomato. Enjoy!You can roast any other vegetables you desire with this easy dinner recipe as well. Use sliced peppers, leftover boiled or baked potatoes or sweet potatoes.
This easy dinner recipe for pork tenderloin prepared is very with garlic and ginger, but it is delicious! It is worth the effort to make the pockets for the ginger and garlic. The spiciness penetrates the meat. If you don't want to be bothered making the pockets, then coat the meat with the spices on the outside. I prefer Lawry's Seasoned Salt for coating the outside, give it a good sprinkle. The salty spiciness makes this dish.
You can prepare a pork loin this way as well, but it will need to cook much longer. Usually, when preparing a loin, I prepare it this way, then put it on the grill for about 30 - 45 minutes or until done.

Stir Fry Chicken With Zucchini

This dinner- a healthy quick recipe for Stir Fry Chicken with Zucchini and Noodles is a busy mom's dream come true. It is an extra quick and easy chicken recipe that is inexpensive to boot. The noodles cook in 1 minute once the water boils and the chicken only needs a few minutes of stir frying. The dish is low in fat and healthy, and sure to be a hit for dinner on those busy nights. Why not bring out the chopsticks and practice up on your skills.
To thinly slice the chicken, place the breasts in the freezer for a few minutes to partially freeze the meat. The breasts will then be firm but not hard and easy to slice thin. Be careful not to freeze solid however, frozen chicken is nearly impossible to slice. Instead of the ramen noodles, you could also serve this recipe over stir fried rice or alone with additional vegetables.


Stir Fry Chicken with Zucchini and Noodles
1whole or 2 halves chicken breast, diced or sliced thin
1 Tablespoon oil
1 clove garlic crushed, or 1 teaspoon minced garlic
2 tablespoons light soy sauce
1/2 cup bamboo shoots, sliced into matchsticks
14 cup canned mushroom slices
1 1/2 cups diced zucchini
1 Tablespoon cornstarch
1/4 cup water or chicken broth
3-4 packages chicken flavored ramen noodles depending on your guests
Put on the water for the noodles. Ramen noodles cook fast, follow the package directions, but you will drain them for serving. There is no need to cook them separately, just do them all in the same pot. When the cooking time is up, take them off the heat; keep them warm until the chicken is done, then drain.
Stir fry the chicken over high heat with the garlic in a small amount of oil. When it turns white, add the soy sauce and continue stirring for a 2 to 3 minutes.
Add the zucchini, bamboo shoots, and mushrooms. Continue cooking for a few more minutes
Mix the cornstarch with the water or broth. Stir into the mixture and cook, stirring until thickened.
Serve the Chicken with Zucchini over a bed of drained ramen noodles. Serves 4.

Chicken Pot Pie Recipe

3 fresh boneless skinless chicken breast4 tablespoons of real butter 1 small chopped onion 1/3 cup of flour 2 teaspoons of salt 1/2 teaspoon of pepper 2 cups of chicken broth 2/3 cup of milk 3 medium potatoes diced 2 bags of Freshlike Steam in Bag Mixed Vegetables 1 package of refrigerated pie crust at room temperature


Preheat oven to 420 degrees. The secret to preparing this recipe is having all of the ingredients ready at the same time. Cook chicken breast in large pan by covering chicken with 6 cups of water 1 teaspoon of salt, 1/4 teaspoon pepper on medium simmer until done, approximately 45 minutes. While your chicken is cooking, peel and dice your potatoes, after rinsing potatoes, microwave potatoes in 1/2 cup of chicken broth in a covered dish for 6 minutes. Layer 1 of your refrigerated pie crust in a deep dish pie pan. Microwave each bag of mixed vegetables for 6 minutes each, not two bags at the same time.
When chicken is done, drain and dice your chicken breast. Heat butter in a large skillet over medium heat, add onion and stir frequently until onion is tender and transparent, then add flour stirring constantly to make your rue. Now add 1 teaspoon of salt, 1/4 teaspoon of pepper and remainder of chicken broth and milk slowly, cook and simmer until creamy, then add the potatoes, mixed vegetables and diced chicken, stir to blend well. Remove from heat and pour into your crust lined deep dish pie pan, top with the remaining pie crust, flute edges to seal and make a couple of slices into the top of crust to vent. Bake approximately 35 minutes until crust is lightly browned, after the first 15 minutes of baking cover the edges of the crust with foil. Let cool approximately 15 minutes before serving.

Meatball Stroganoff

Do you need an easy dinner recipe for those busy nights? Dinner is the most important part of the day. Sitting down together as a family to enjoy a well prepared meal is so important. Unfortunately, it can also be the most stressful part of the day when you're the cook. The key to a stress-free dinner hour is advance planning and organization along with an arsenal of quick and easy dinner recipe and menu ideas. This Meatball Stroganoff recipe has what it takes to get you to the table. It is easy and quick to prepare - less than half an hour from start to finish.
Buying frozen meatballs cuts the preparation time greatly. You have only to brown the meatballs and make the sauce. Simmer for 10 minutes and dinner is done. Serve over buttered noodles or hot fluffy rice with a green vegetable. I hope you will try this quick and easy dinner recipe soon.
Be sure to start the water for the noodles or the rice before you begin to brown the meatballs, as the noodles take almost as long to cook as the stroganoff and the rice takes longer.


Meatball Stroganoff
1 ½ - 2 pounds frozen Italian style meatballs
¼ cup margarine or butter
¾ cup onions, chopped
½ lb. mushrooms
¾ teaspoon paprika
2 Tablespoons flour
1 (10 oz.) can beef bouillon, undiluted
¾ teaspoon salt
1/8 teaspoon pepper
1/2 teaspoon Worcestershire sauce
½ cup sour cream
Hot fluffy rice or buttered noodles, cooked
Brown the meatballs in 2 Tablespoons of margarine or butter. Remove to a dish.
Add 2 Tablespoons more butter and saute the onions and mushrooms with paprika until tender.
Sprinkle flour over the mixture. Stir, to briefly cook the flour, then slowly add the bouillon, salt and pepper, stirring.
Return the meatballs to the pan, cover and simmer for 10 minutes.
Just before serving, add the Worcestershire sauce and sour cream. Heat through, but do not boil. Serve over rice or hot buttered noodles. Garnish with parsley if desired.

Chicken Breasts Glazed with Hot Pepper Jelly Sauce


What's for dinner? The answer to the dreaded question when you're busy and out of ideas -chicken, an easy recipe that is guaranteed to get you out of the dinner time rut and start your creative juices flowing. Well this recipe is just the thing to add interest back into your dinnertime. This Chicken Breasts Glazed with Hot Pepper Jelly recipe can be on the table in under 30 minutes, even less if you pound the breasts for quicker cooking and tenderness.
This is a different presentation of chicken, an easy recipe. You can use a pepper jelly that is mild or extremely hot, according to your taste. The sweet and spicy flavors of the jelly and mustard compliment the chicken breast, and the celery adds a visual and textural interest. This recipe serves 2, but you can increase the amounts to serve more easily.


Chicken Breasts Glazed with Hot Pepper Jelly Sauce
2 Tablespoons hot-pepper jelly
½ teaspoon Dijon mustard
1 chicken breast, halved, boneless and skinless
Salt and freshly ground pepper
2 Tablespoons unsalted butter
2 medium celery ribs, cut into matchsticks
1 tablespoon fresh lemon juice
1 tablespoon coarsely chopped celery leaves
Pound the chicken breasts to an even thickness.
Combine the pepper jelly and the mustard, set aside
Season the chicken with salt and pepper.
In a large skillet, melt the butter over medium high heat. Add the chicken breasts and cook, turning once, until they are browned, approximately 3 minutes per side.
Pour off most of the fat. Add 1 tablespoon of water and stir to loosen the browned bits on the bottom.
Push the chicken to one side, add the celery matchsticks and cook stirring for 1 minute.
Add the jelly mixture and the lemon juice and shake to coat the chicken with the sauce.
Cook until the sauce is reduced to a glaze, about 20-40 seconds.
Transfer the chicken to a plate or platter. Spoon the matchsticks on top and garnish with the chopped celery leaves.
Serve immediately. Serves 2.

Baked Ham Steak With Pineapple


Are you often rushed in the evenings? Finding it hard to get dinner on the table and still have time for the important things in life? A few easy quick recipes, combined with a little planning will make cooking dinner a pleasure again.
Look for recipes that are simple --with minimum preparation, then let your oven or slow cooker do the work. This recipe features an easy preparation, then cooks quickly in only 20 minutes in the oven while you fix a salad and warm some dinner rolls. Baked Ham Steak with Pineapple is an old favorite that can easily and quickly solve tonight's dinner crisis.


You will find these pre-sliced ham steaks vacuum packed in the meat department of your grocery. Sizes range from 1 to 2 pounds. This recipe calls for 1 1/2 pound, but choose a steak that will serve your family. If it is much smaller, then cook for a little less time. This serves 4 generously.
Baked Ham Steak with Pineapple
1 1/2 pound ham steak
1 can pineapple rings
brown sugar
cinnamon
1. Preheat the oven to 375 degrees F.
2. Trim off or slice through the fat on the edge of the ham in several places to prevent curling in the pan.
3. Place the ham steak in a shallow ovenproof pan and place the pineapple slices on top. Pour the pineapple juice over all.
4. Place the ham steak in the oven and bake for 20 minutes (uncovered).
5. After 20 minutes, remove the pan from the oven and turn the oven up to broil.
6. Baste the ham with the pan juices. Sprinkle a little brown sugar over the pineapple slices and dust with cinnamon.
7. Return to oven and broil for 3 to 5 minutes or until the pineapple is lightly browned. Serve each ham steak with a pineapple slice.
Serve with a tossed salad and dinner rolls for an easy quick dinner recipe solution. I hope that this menu will find its way onto your table soon.

Bison Meat

Bison is just another word for buffalo. People have been eating buffalo meat for years, probably ever since explorers arrived in America and saw just how plentiful this animal was. Its way of life was very much like that of a cow so it was easy enough to learn to like its meat.
Today, bison meat is making a comeback - though on the supermarket shelves. The reason probably is that here is a red meat alternative that is low in cholesterol, low fat and low in calories. With bison not becoming a mass-produced meat though it is plentiful, it is a healthier meat to have, being free range and grazing in the open for the most part and being free of hormones and antibiotics.


The meat has a sweetness and is filled with flavor and there are a number of restaurants both in the US and Canada that have started serving various delicious dishes made from this meat. And because it is denser than beef, you end up eating less of it.
Bison meat or Buffalo meat could well be the meat of the future and one way to get out of the vicious cycle of hormone and antibiotic laden beef. Considering the fact that more people are becoming aware of the dangers of these substances in meat, one would think and hope that bison meat gains in popularity soon.
There are stores online where you could order your bison meat. Take a look at the calorie count and maybe if you would like to count your calories, this is one meat to order rather than go off meat altogether. And the ones who have tasted it feel that it's a meat that is tasty and tender.

Hungarian Beef Goulash

Goulash is a well-known dish from Hungary. In Hungary, where the dish is known as "gulyás" or "gulyásleves", goulash was traditionally eaten by cattlemen and cowherds working on the Great Hungarian Plain (which lies partly in southern and eastern Hungary, but also extends into several neighbouring countries). Of course, cattlemen could not carry large amounts of cooking equipment or ingredients with them, and so the dish was generally prepared with items that they had to hand.


If you have only ever eaten North American versions of goulash, you may be surprised at the taste of the Hungarian version of the dish. In North America, goulash is generally prepared as a kind of stew, with lots of tomatoes, only a modest amount of herbs and spices, and often made using hamburger meat. This results in a dish that is mild, a comfort food, and which is easy and quick to prepare. American goulash often ends up resembling an Italian pasta dish, especially since it is frequently served with noodles or macaroni.
Hungarian goulash is prepared as a soup, although by the end of the cooking process it actually has a very thick texture. Beef shin, shank or shoulder is cut into chunks, seasoned, paprika added, and then meat is browned. Chopped onions, and then water or stock is added. This is left to slowly simmer in a cauldron (known in Hungarian as a "bográc"). Other ingredients that may be added include a little tomatoes, hot pepper, chopped potatoes, herbs, and perhaps a little vinegar or white wine.

Shrimp and Grits - Simple Food, Not Fast Food

When you hear the words shrimp and grits, you naturally think of the Southern states that border the Gulf of Mexico: Alabama, Mississippi, and Louisiana. This is not a dish prepared often in Florida or Texas, since these states have developed different cuisines of their own. Texas is the oil and beef region, while Florida is a bit of heaven for senior citizens and college kids.
Shrimp and grits is a simple dish. You cook the grits and you cook the shrimp and just before serving, mix them together, right? Well, sort of. Grits are a versatile food. They can easily be turned into a base for sweet or savory or spicy dishes, or even eaten on their own like porridge.
When cooking shrimp and grits, it's a good idea to cook the grits based on your plans with the shrimp. Say you were in the mood for a spicy dish. You decide to cook garlic shrimp, using fresh garlic along with some finely diced peppers and onions. Since the grits won't cook as quickly as the shrimp and vegetables, you'll want to be sure to get them started first.


Now, we could set the grits boiling in plain water, but where would the flavor be in that? Better to use a low-sodium chicken or vegetable broth mixed with a broth made by boiling the shells of the peeled shrimp in a pan of water for a few minutes. Once the grits are simmering (remember to stir occasionally), you can start on cooking the shrimp.
Put cut up onions and peppers together with the dried spices into a fairly hot frying pan with a good deal of butter and saute till softened, remembering to stir frequently. When the onions are halfway cooked, slide the garlic in. After cooking, put the mixture to one side. When the grits are ready, blend in a bit of cream, turn up the heat under the shrimp pot, and add a bit of lemon rind along with the shrimp. The shrimp should be cooked till they're pink. Take them off the burner, throw in a little chopped parsley, and pour in the lemon juice. When serving, the shrimp should be placed on top of a mound of grits.
I know it's a cliche, but salt and pepper and spice to taste. Good herbs and spices for this dish include ginger, cayenne, dill, and parsley. Don't be afraid to experiment, but remember that shrimp & grits are simple flavors that, though they mix well with a lot of things, are easily overwhelmed by too many strong flavors in the dish.
When you think about shrimp and grits, you think about the south, in particular, Alabama, Mississippi, and Louisiana. These three states sit on the Gulf of Mexico. Florida and Texas aren't really in this category as they each have their own unique identity. Texas is associated with oil and cattle, and Florida is home to many retirees and is a popular vacation destination to students on spring break. It's fairly easy to prepare shrimp & grits. While you can add salt and pepper or other spices to suit your taste buds, don't be heavy handed!

How to Make a Pizza

Before I made my Pizza I had to make some Italian Tomato Sauce.
Ingredients:
1x onion 1x garlic clove A pinch of Salt 1x Jar of Passata (preferably for Pizza Sauce) ...or 2x tins of good quality Tomatoes (preferably for Pasta Sauce) ...or a kilo of ripe tomatoes 1x Tablespoon of sugar
Add the onion and a pinch of salt, preferably Malden Sea Salt. Fry them off for about 10 minutes, in olive oil, slowly on a medium heat. Be careful you do not want to colour the onion. After 5 minutes add the garlic, you can crush the garlic with salt to create a paste. However I used the Goodfellas method, well I used my sharp chefs knife rather than a razor blade. You can always add half a chili if you want to make an Arrabiata sauce. If using passata, I like to add sliced sundried tomatoes as they add an extra bit of texture and depth to the sauce


You might want to rinse out your bottle/can with some water and add the juice to the pan or add a little wine. Taste for seasoning, I normally add a little sugar, to help bring out the sweetness of the tomatoes. Let the sauce gently simmer on the lowest hear for an hour or two. The sauce will thicken up, and you will have the perfect tomato sauce for a pizza. If making Pasta sauce add the Basil leaves at the last minute.
This is pretty much the basic recipe for any good tomato sauce.
Next I made the Pizza base
Pizza Base From Jamie Oliver's book Jamie's Italy
Ingredients:
800g Strong White Floor 200g Semolina flour or more strong bread flour 1 level tablespoon of fine sea salt 2x7g sachets of dried yeast .....or 30g of fresh yeast 1 tablespoon of golden caster sugar About 650 ml of tepid water
Pizza Topping
Ingredients:
Pizza Sauce Basil Leaves Mozzarella (Cows Milk) A drizzle of extra virgin olive oil
The recipe states it will make 6-8 medium sized thin crust pizzas. I halved the ingredients and made use of some Italian type "00" flour I had. The breakdown of the flours I used was
200g Strong Bread Flour 200g Italian type "00" flour 100g semolina floor.
1. Put the flours and salt in a bowl or on a clean surface. Add the yeast and sugar to the water, leave for a couple of minutes. Then combine the water/yeast mix to the flour, bring it together with a spoon/fork and then your hands, so it becomes one big ball. Make sure it isn't too wet or too dry.
2. Then knead for about 10 minutes or till you have a soft and pliable dough. Flour the top of the dough and add it to the oiled bowl, cover with clingfilm and leave for 15 to 30 minutes.
3. Divide the ball of dough into however many pizzas you want. The dough wants to be rolled out about 15-30 minutes before it goes in the over. If using a pizza stone, sprinkle some semolina flour or regular flour on the stone and it will stop the pizza sticking to it.
4. Once the dough is ready I add a thin layer of tomato sauce, and put it in a pre-heated oven at 220 Celsius/ for about 5 minutes, bring it out, add the basil leaves and then cover them with the mozzarella. For making pizza it is actually best to use cows milk mozzarella because it has less liquid in the cheese compared with the pricier buffalo mozzarella. Add some olive oil to the cheese and then add to the over for 10-15 minutes or until the cheese has melted and the base has a nice golden colour it.
This is pretty much the classic Neapolitan pizza. This pizza is the epitome of Italian cuisine, 3-4 amazing ingredients, cooked perfectly it makes the sauce, basil and mozzarella the star. Simplicity is the key.

Acidophilus Milk

Acidophilus milk is a sour milk product that has been allowed to ferment under conditions that favour the growth and development of a large number of Lactobacillus acidophilus organisms. This acidophilus milk is considered as a probiotic since it aids in the well being of the consumer. Acidophilus milk differs from Indian dahi or curd in that the milk used in the preparation and the types of microorganisms involved are different. The final products differ from curd in body, texture, consistency, flavour, chemical composition and in antibacterial activities.


Utility of acidophilus milk
Products of mixed fermentation such as acidophilus yeast milk, being rich in alcohol and carbon dioxide, excite the respiratory and central nervous system. This improves the process of oxidation and reduction in the organism and hence there is an increase in the oxygen flow to the lungs. In the erstwhile Soviet Union, acidophilus yeast milk is widely used in treating tuberculosis.
The recent emphasis on feeding Lactobacilli is attributed to the side effects of antibiotics. Antibiotics damage all the viable intestinal microorganisms (desirable or pathogenic) and cause intestinal discomforts manifested by flatulence and diarrhoea. Colonization of L. acidophilus in the intestines accelerates the return to normalcy of intestinal microflora. A Romanian strain of L. acidophilus is claimed to have been developed for the treatment of gastrointestinal disorders but it also helps in the improvement of general vigour and health.
It is reported that acidophilus milk product combined with chemotherapeutic preparations can also be used effectively for several diseases such as typhoid, paratyphoid, osteomyelitis, pneumonia, migraine and urological infections. Experiments have revealed that the body weight of a child or animal increases when fed with milk containing acidophilus organisms.
METHOD OF MANUFACTURE OF ACIDOPHILUS MILK
The acidophilus milk containing Lactobacillus acidophilus differ in the type of starter culture and milk used for their preparation. Acidophilus sour milk, as the name indicates, is a sour milk beverage made out of standardized milk by acidifying it with pure culture of acidophilus rods. Milk cultures of L. acidophilus have the therapeutic value but do not possess the buttery acetaldehyde flavour of the regular fermented milk such as curd and yoghurt.
· The milk meant for preparation of acidophilus milk is standardized to 3.5% fat and 8.5% SNF content.
· The standardized milk is sterilized and cooled to 40°C.
· The milk is then inoculated with 24 hours old pure culture of L. acidophilus at the rate of 2-3%.
· It is filled into clean glass or plastic containers (200 ml volume) and incubated at 40°C for 8 hours.
· The acidophilus milk is then cooled and stored at 5°C till it is consumed.
The acidophilus milk thus obtained is sour with 1 to 1.25% lactic acid and pH 3.7 - 4.0. The product should contain more than 2000-3000 million viable L. acidophilus organisms per ml, which possess satisfactory antibiotic effect against E. coli as well as other pathogenic and non-pathogenic undesirable bacteria present in the intestinal tract. The viability of the organism is of primary importance in the use of the acidophilus milk. The acidophilus milk can be preserved up to a week, below 5°C.

Healthy Filipino Food Lunches

Breakfast is the most important meal of the day, but that doesn’t mean it’s okay to scrimp on lunch. Whether you’re in school or at work, you need that midday meal to keep up your energy for the rest of the day. If, like most students and yuppies, your idea of a regular lunch is soda and crackers, you’re a long way from eating right.
So what makes a healthy lunch? If you want something that’s light but filling, Filipino food is your best bet. For one thing, it’s cheaper than buying fast food or ‘light’ snacks like coffee and cookies. It also lets you choose exactly what goes into your food. It doesn’t have to be rice-based or anything heavy; there are lots of easy Filipino recipes you can prepare at home. Here are a few tips to help you get started.


Plan ahead
Planning is the key to preparing healthy lunches and to healthy eating in general. When you know what you’re having for the next few days, you won’t be tempted to pick up that extra soda or grab an ice cream for dessert. At the start of the week, list down your lunch choices and make a shopping list based on your picks. Buy more than you need so you can pack a little extra for mid-afternoon munching.
When planning your meals, consider the time you can spare each day for cooking. A half hour is all you need to fix a sandwich or toss up a quick salad. On really busy days, you can just buy frozen food and packed drinks. Alternatively, you can prepare and pack your lunches in advance on light days, so you can just pick them up when you’re in a hurry.
Have something fresh
Make fresh fruits and vegetables your lunch box staples. Remember, lunch has to be lighter than breakfast; otherwise you’ll feel drowsy all afternoon. Fresh produce fills you up fast but doesn’t slow down your body. Salads and veggie wraps are a great way to work vegetables into your meal. If you’re watching your weight, you can replace heavy Filipino desserts recipes with fresh fruit. A chilled apple or a couple of melon slices can satisfy your sweet tooth without piling on the calories.
Most groceries sell fruits and vegetables packed into serving-size portions. It’s very convenient, but you can save as much as 50% of the price if you buy them whole and prepare them yourself. It takes about 10 minutes to peel, slice, and pack a week’s worth of food.
Don’t follow your cravings
When shopping for lunch items, you tend to pick up the things you crave at that very moment. More often than not, you’ll either be tempted to eat it ahead of time, or your craving will have passed by the time you pack it. It’s best to stick to your old favorites, be it a simple tuna sandwich or classic Filipino food recipes. Pick up a few treats for variety, but don’t make them your entire meal. But to avoid the problem altogether, don’t shop with an empty stomach—when you’re hungry, your mind goes wild at the sight of food. The best times to shop are usually late morning, just after breakfast or your midmorning snack.
Watch your portions
Some containers may not look big, but they hold a considerable serving. Be careful not to overdo your portions, as many tend to do when pre-packing. Again, it’s best to pack when you’re full so your cravings don’t influence your serving sizes. Get containers that hold only the appropriate portions, or have a small portion bowl’ approximately the size of a regular serving, so you can measure your servings before packing them.
Pack light
A lot of Filipino cooking recipes come with heavy sauce or soup, which makes them hard to pack for lunch. If you’ve ever spilled lunch inside your bag, you’ll know how important it is to use the good, tightly sealed containers. Better yet, don’t pack heavy lunches to avoid the risk. You can keep sauces and condiments for dry food in your office, so you don’t risk spilling them on the way.
If you do pack saucy dishes, try packing the solid and liquid parts separately. Use a disposable container for pasta or vegetables, and a regular suction-sealed one for the sauce or dressing. Invest in containers with tight rubber seals. They’ll cost you more initially, but it’s well worth the trouble you save in the long run.

A Pizza

A pizza consists of a crust, sauce, cheese (and it doesn’t HAVE to be mozzarella) and toppings. Some pizzas are nothing more than a vehicle for piling as much gooey cheese as possible. Other pizzas go easy on the cheese and concentrate more on perfecting the flavor of the sauce and the consistency of the crust.
Whichever pizza is more your style (and some would say that ANY pizza is their style), you’re sure to be able to find someone who would be willing to argue about your choice with you.
Some of the most popular toppings are the old favorites: pepperoni, sausage, veggies and, of course, extra cheese. Although some would argue that extra cheese qualifies as a topping. Just because these are the most popular, does that necessarily make them the best pizza toppings?
Many of your who are over 40 can remember a world where putting ham and pineapple on a pizza was considered bizarre. Today, adding such toppings is often called a Hawaiian pizza, and it’s a very popular choice nationwide.


At some state fairs in the late 1980’s, vendors offered two pizzas that were pretty innovative at the time. One was a pizza void of tomato sauce and covered instead in a white sauce, cheese and spinach. The other was a pizza crust topped with only cheese and big hunks of broccoli.
The first pizza caught on pretty well, and spinach on pizza isn’t considered very unusual. White pizza - with or without the spinach – is hugely popular. The broccoli pizza, however, never really found it’s place and I think you’d be hard pressed to find a pizza that resembles that fair ground fare from the 80’s.
The reason is probably two fold: One is that pizza was totally void of sauce. Therefore, it can’t even technically be considered pizza. Secondly, the ingredients of a pizza are supposed to blend together to provide a perfect pizza experience. When you bit into the broccoli pizza it was sort of like “Oh, this is very dry pizza..hey, wait a minute! I’m gnawing on raw broccoli…..!!” Really, that’s what it was like. People that want to eat crunchy raw broccoli order salad, not pizza. That broccoli pizza never had a chance.
There is never going to be a time when everyone agrees on what makes a perfect pizza, and that’s okay. At the heart of every passionate pizza lover is one common thought:“Pizza is the best food in the world!”
Pretty simple, isn’t it? Crust. Sauce. Cheese. Toppings. The rest is open to private interpretation. Instead of arguing about it, wouldn’t that time be better spent just enjoying a slice?